
How to use the VSN Website templates
Introduction
The Vaccine Safety Net (VSN) is a global network of websites, established by the World Health Organization, that provides reliable information on vaccine safety.
To support membership from institutions with limited resources, the WHO Pharmacovigilance team developed the “VSN Website Template”. This is a capacity building tool, which will assist candidate websites from national regulatory authorities, national immunization programs and professional associations to comply with the VSN criteria for good information practices and join the network.
This template is a “minimum package” containing placeholders for implementing the VSN criteria for good information practices, suggestions on how to adequately address different criteria with examples and screen shots by VSN members and suggested vaccine safety topics to be included to address the criteria related to the content of the website. Topics such as immunization and vaccine safety, tailored to a lay audience and healthcare professionals are included.
Adoption of the VSN website templates will ensure that the website complies with the best practices in terms of accessibility and design and will alleviate the burden of maintenance and update of the website.
Disclaimer
All reasonable precautions have been taken by WHO Pharmacovigilance team to verify the information contained in these VSN templates. However, the content is being provided without warranty of any kind, either expressed or implied. Use of VSN template is strictly voluntary and at the user's sole risk. In no event shall WHO be liable for damages arising from its use.
Note
VSN Website Template package is a Static HTML template and this document is a how-to that describes basic out-of-the-box structure, deployment and initial setup. This how-to does NOT cover integration with any CMS or Web Application Framework or any other similar technology.
Template deployment
Prerequisites
In order to successfully setup and deploy the template on a live server environment you will need:
- basic level computer skills
- simple text editor e.g. Sublime Text, Notepad++ or similar
- file compression software e.g. 7-Zip, WinZIP or similar
- FTP client software e.g. FileZilla or similar
- VSN Website Template package .ZIP file
- Acquired domain name and a basic hosting account
Note
Domain names can be acquired at any of local service providers as country code top-level domain (ccTLD). It is an Internet top-level domain generally used or reserved for a country, sovereign state, or dependent territory identified with a country code. For example, ‘.us’ ‘.ca’, ‘.uk’, etc. Domain names and hosting account can also be acquired via popular service providers such as Domain.com, GoDaddy, Register.com etc. In this case you can also choose a top-level domain (TLD). A TLD is everything that follows the final dot of a domain name. For example, ‘.com’ ‘.org’, ‘.edu’, etc.
In case that you haven't yet downloaded the VSN Website Template package please visit our Download page There you can choose the template based on the type of institution in question and also optionally select Landing Page type and Primary/Highlight color for the template. Once you have downloaded the Package you are ready to continue with initial setup and deployment.
Step 1
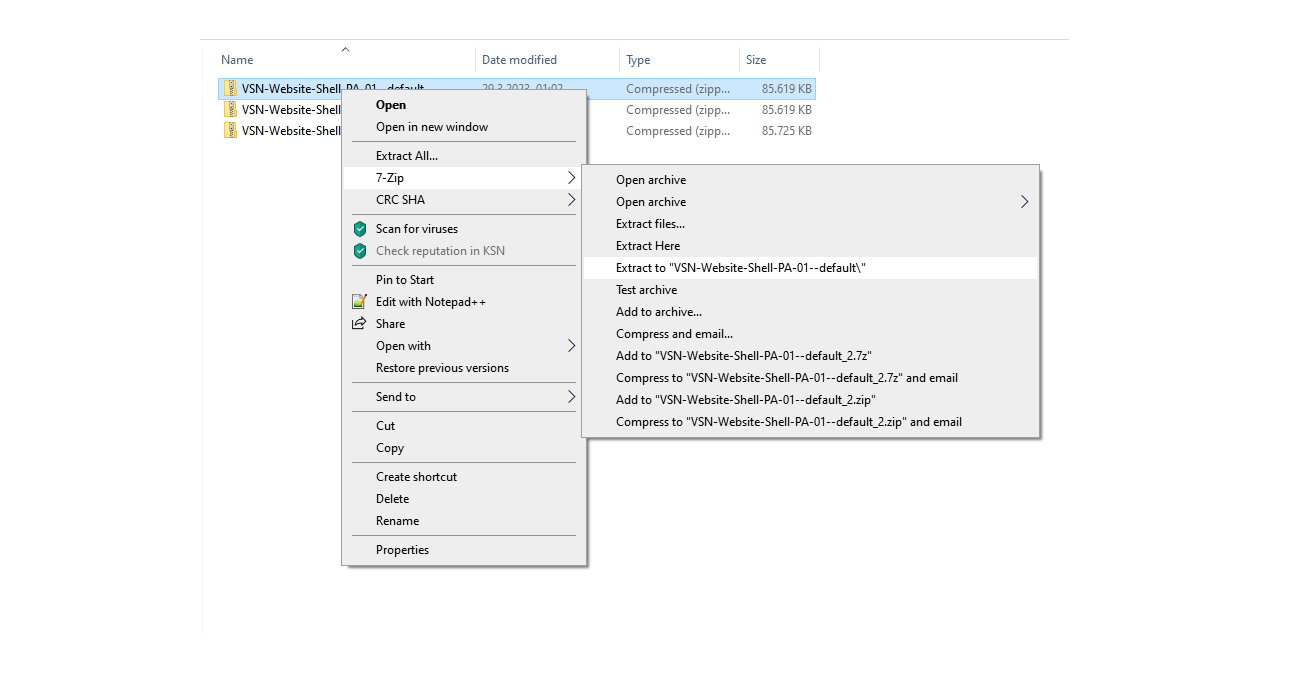
Select the downloaded VSN Website Template package archive file and extract it on your local hard drive using file compression software of your preference. 7-Zip is used in this tutorial.
Step 2
After successful package download and extraction to local hard drive, VSN Template package needs to be edited to reflect Institution/Organization real life data. In this how-to we will cover basic setup and deployment steps, and since this package is a static HTML/CSS and JS template, we will edit individual .html files.
For this purpose any of the proposed simple text editors can be used or you can decide on any other following your own preference. For examples in this how-to Sublime Text editor is used because of its rich and handy features. Sublime Text editor can be downloaded here. It is a commercial software, however demo unregistered version has full functionality for the purpose of this how-to so you should be able to successfully follow this tutorial.
Once installed, open Sublime Text and navigate to downloaded and unpacked VSN Template archive folder created in Step 1. and open it in editor.

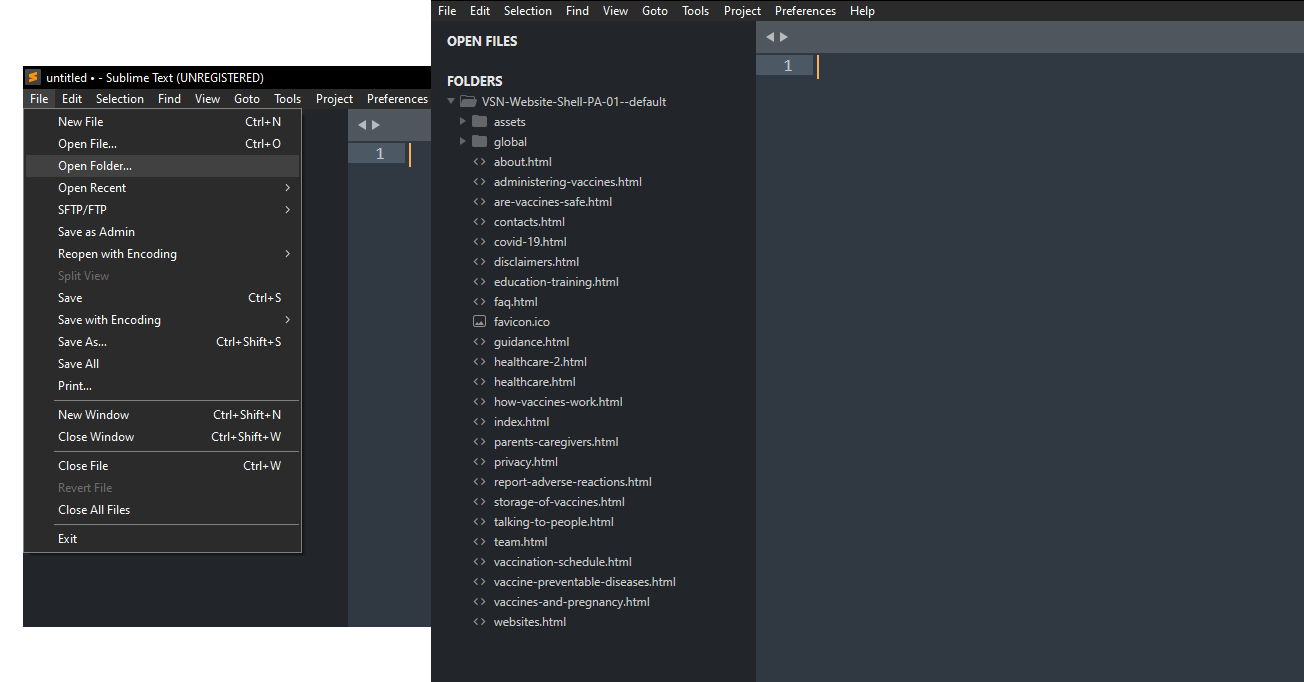
Clicking on folders on the left navigation panel expands their content and clicking on file displays it in preview mode. Double clicking on a file opens it and you can navigate to file on the top of the left navigation panel.
Since main landing page of the template is index.html we will start there. Double-click on the file and open it in editor.
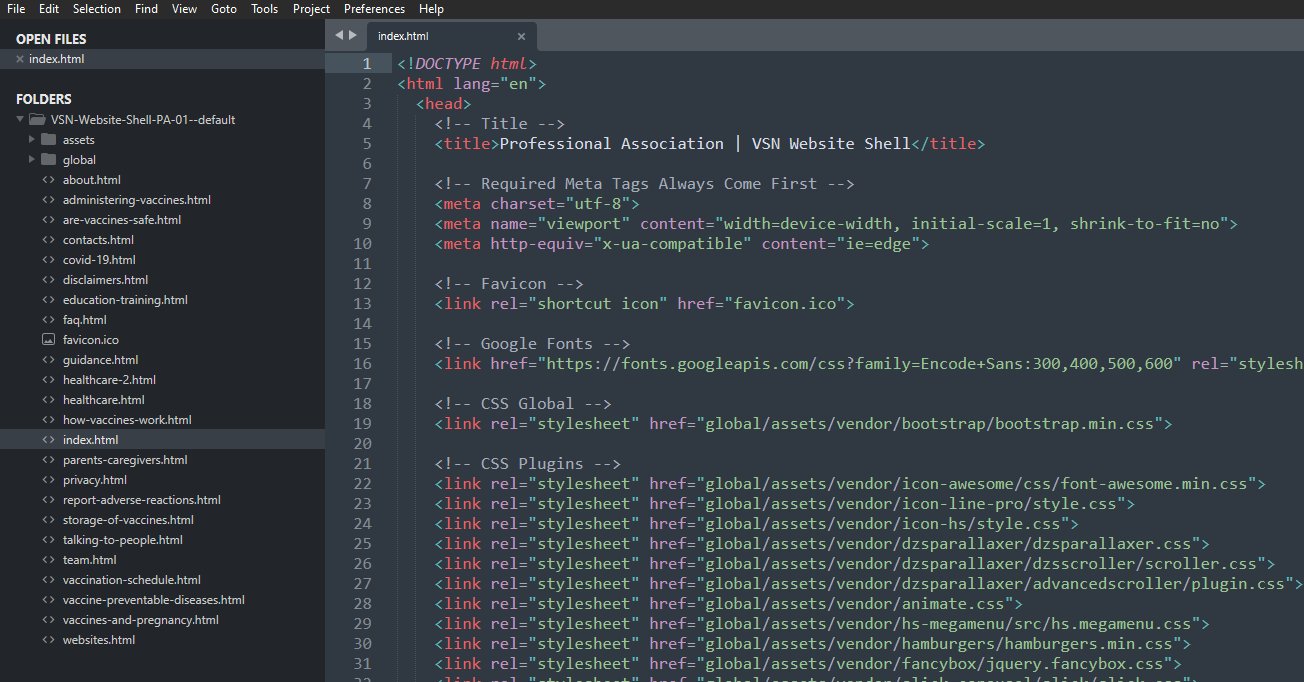
In the HTML code you will notice specific tags such as <head>, <title>, <body>, <header>, <footer> etc. In this how-to we are covering the basics so we are not going in depth with explaining HTML markup language, however if interested in expanding the matter a good starting point is here.
One more thing to notice in the HTML code is a comment <!-- Required Meta Tags Always Come First -->
HTML Comment begins with <!-- and ends with --> so everything that finds itself in between these two tags is considered to be a comment and it is not rendered by the browser. For easier navigation during initial setup and deployment comments are used extensively in all .html files as page blocks and section labels, dependency scripts and file labels, etc. and can be removed after deployment on a live environment.
Before uploading to a live server environment, we need to edit individual .html files and fill them with real life Institution/Organization data.
In every .html file, main navigation bar and logo are found within <header></header> tag. On the bottom of the file you will find <footer></footer> tag where also we have navigation items, logo as well as other content. Everything that is between these two tags is actual page content.
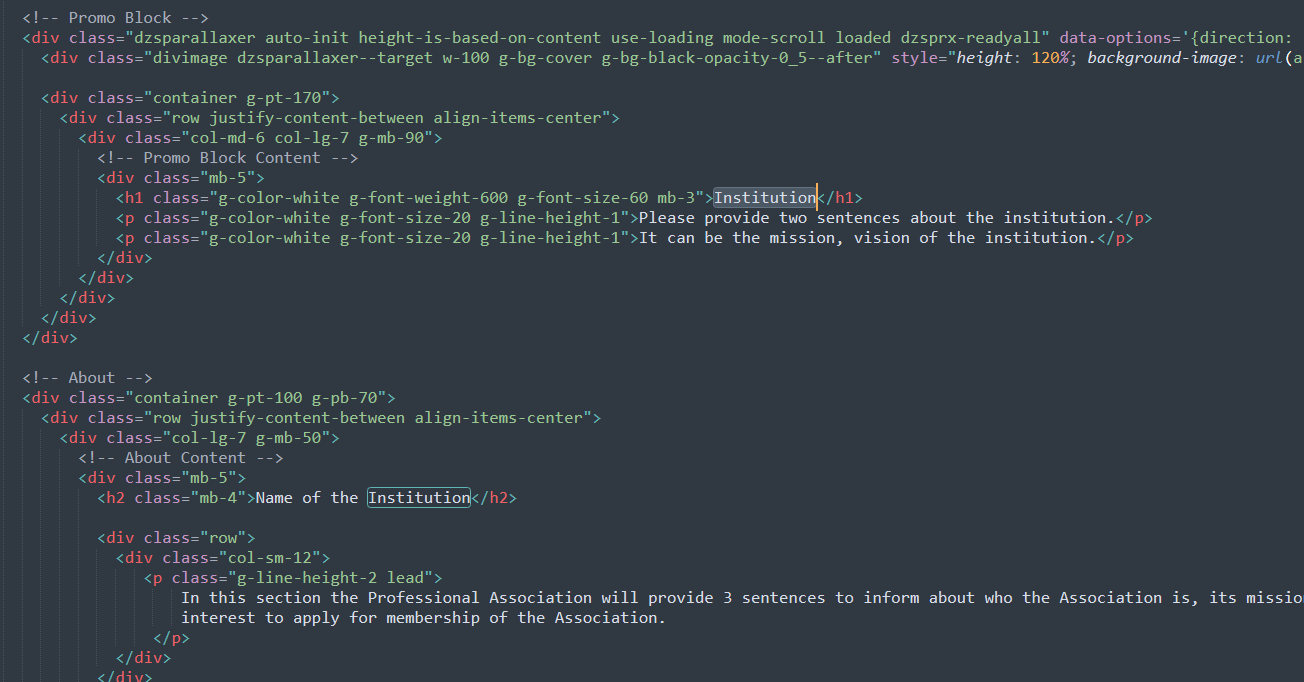
We will start by editing page title <title> in current index.html file and by using some of the Sublime Text features in all of the other pages as well. Select <title> tag from beginning to end and go to top menu Find/Find in Files or hit Ctrl+Shift+F.
On the bottom of the editor you will notice a pop-up window where under replace you can enter actual name of the Institution. Enclose the name within <title> tag as shown on image and hit Replace button on the bottom right.

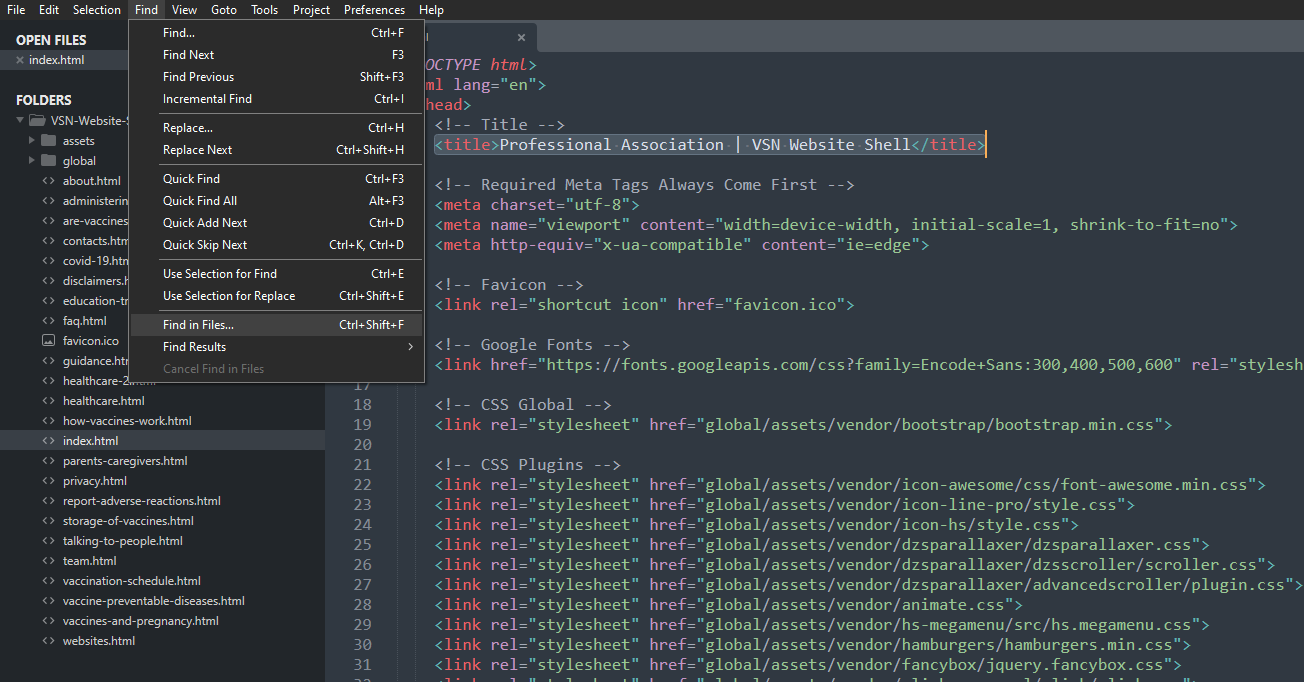
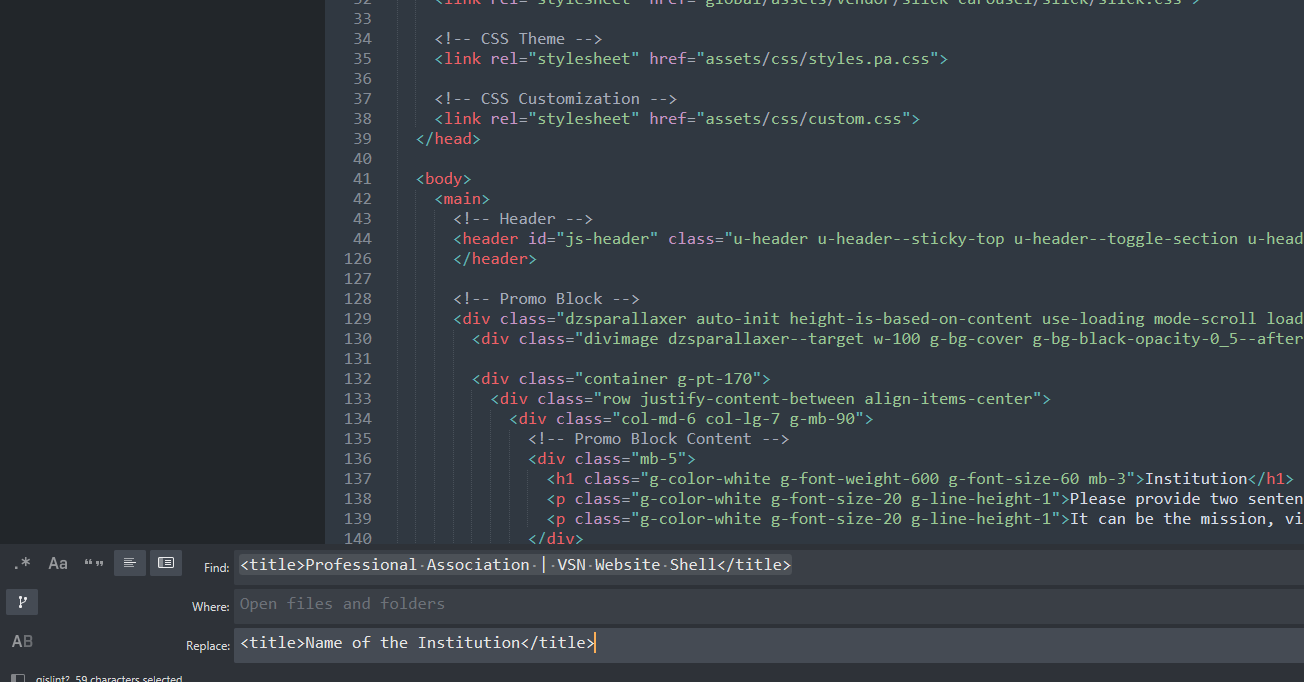
Sublime Text will search within all files in the working folder for the term in Find field and replace it with the term in the Replace field. It will open every .html file in the process and all that needs to be done after is to save every file that Sublime Text edited.
Easiest way to do that is to click on File menu and hit Save All. Other way to do it, file by file, is clicking on any open file ether on left navigation panel or top right tab and hit Ctrl+S or go to File menu and hit Save.

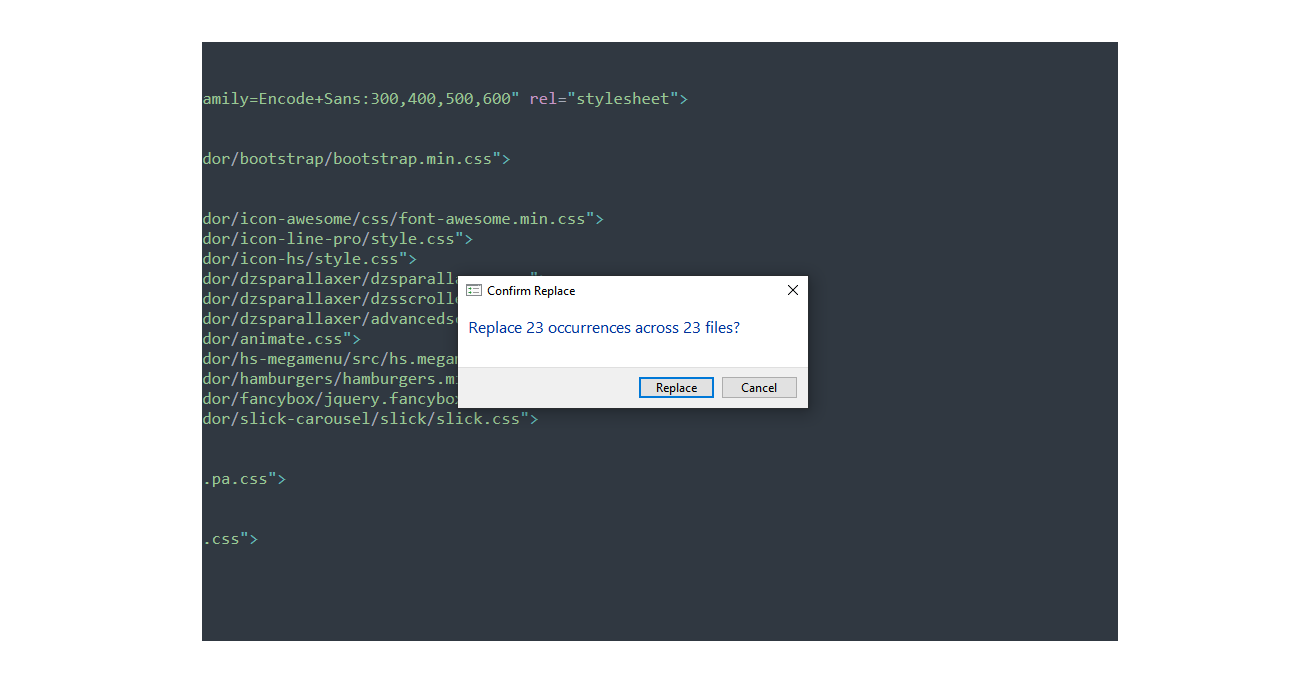
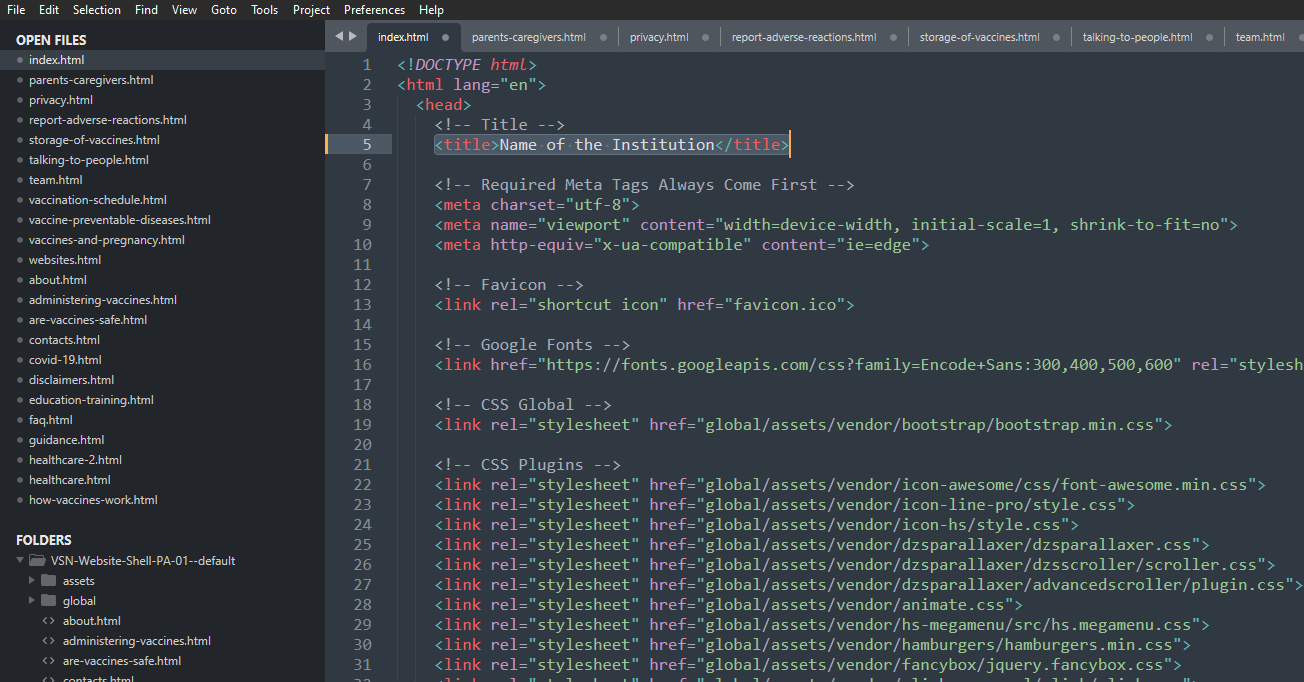
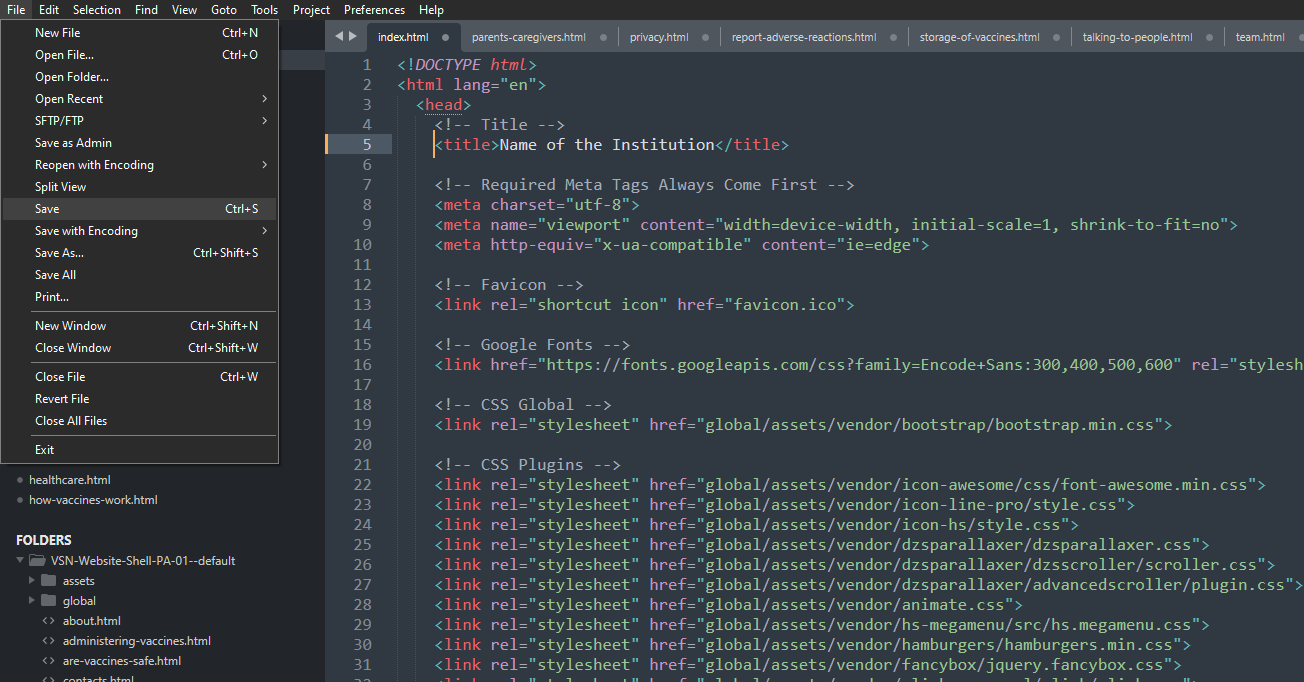
Above we have covered a scenario of replacing/editing content in multiple files. After saving all of the open files, you can navigate to the folder on your hard drive and open any of the edited .html files in Browser for the purpose of previewing the edits.
Continue going through each of the .html files, sections replacing placeholder content with real one that represents the Institution/Organization.
After finalizing textual edits there are two more important customizations to be performed, replacing default template logo and default template browser icon with actual logo of the Institution. As it was the case with editing the Page title this customization also requires change to be done on all the .html files, so we will again use Find in files feature. Make sure you have the logotype image and browser icon files ready.
Note
For the logo supported image formats are .jpg, .jpeg, .png, .gif and .svg
As for dimensions, maximum image height is 45px and maximum image width is 345px.
In case of limited resources there are free online services that can be used to create logo and favicon files. For the logo you can visit Looka Logo Maker. Once you get the proper logo done go to Favicon.io, a free favicon generator where options are to create from image or from text.
Navigate to the downloaded VSN Website Template package folder on your local hard drive and go to /assets/img/logo. Here you need to place the earlier prepared logo file. Once done, open Sublime Text, select index.html on the left navigation panel and double click to open it.
Once opened we will search index.html for instances of the Logo. To do that go to File menu Find or hit Ctrl+Shift+F on the keyboard. In Sublime search field on the bottom of the screen enter Logo and click Find.
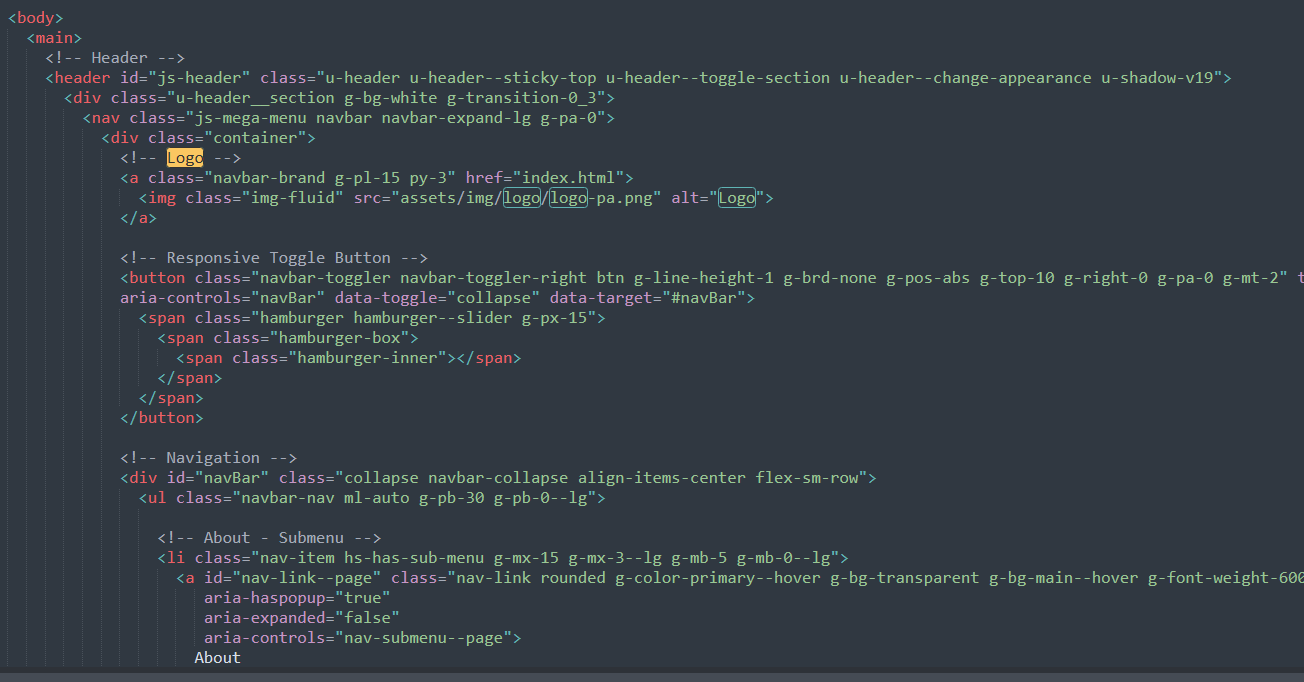
Clicking Find button on the search pop-up window repeatedly will circle between found instances within the index.html file. We are looking for <img> tag which holds the logo image source. src attribute of the <img> tag holds that information so once found we need to replace the default logo file name logo-pa.png with Institution logo file name.

Now we will once more use Find in Files option so that Sublime Text can find all the occurrences of the default header logo file name but this time searching through all .html files for logo-pa.png, so go to top menu Find/Find in Files or hit Ctrl+Shift+F
In the Find field enter logo-pa.png, in the Replace field enter the Institution logo file name and hit Replace button on the bottom right. Sublime will prompt you about how many occurrences across number of files will be replaced so hit Replace to confirm.

We should repeat this process again after changing the Header logo file name as we need to do that on the footer logo. In the Find field enter Logo, and hit Find repeatedly until Editor skips to footer Logo section.

Now go to top menu Find/Find in Files or hit Ctrl+Shift+F. In the Find field enter footer logo file name e.g. logo-pa-white.png and in the Replace field enter the Institution logo file name from previous step and hit Replace button on the bottom right. Sublime will prompt you about how many occurrences across number of files will be replaced. After replacement we again need to save every file that Sublime Text edited in the process and as earlier we can use File menu Save All option.
We should repeat this process again in order to replace the default favicon if the favicon file is named differently than favicon.ico or as a much more convenient solution rename your earlier prepared favicon file to favicon.ico and overwrite the default one in the package folder.

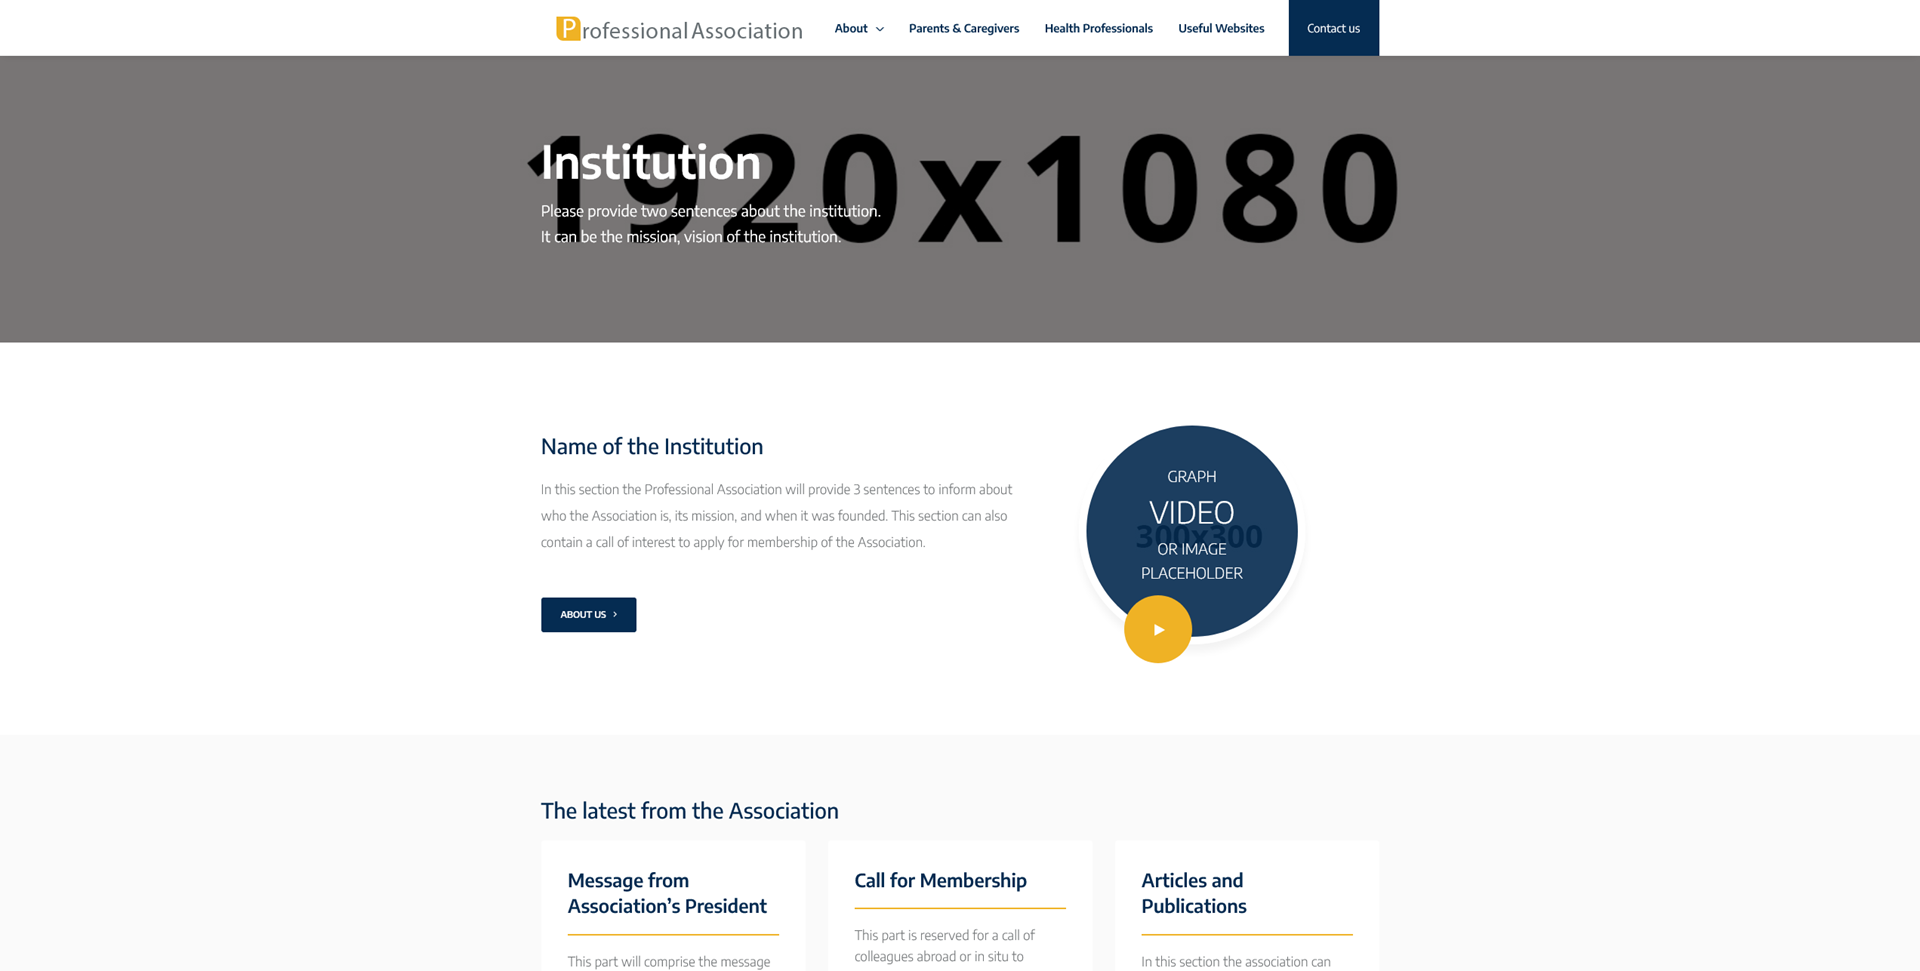
After finalizing edits save and close all open files and minimize Sublime Text. Open index.html file in Browser for the purpose of final preview and click through the webpages. If everything is in order we are ready for next step.
Step 3
In this step, edited package files are going to be uploaded to a server which will effectively publish the web site. For this, as mentioned under Prerequisites, we would need a hosting account setup under a domain name chosen for the Institution. Your hosting provider should provide you with access credentials to their Dashboard and other services such as FTP etc. In this example we are using FileZilla FTP Client but you can use any of the available software at your own preference. FileZilla FTP Client can be downloaded here.
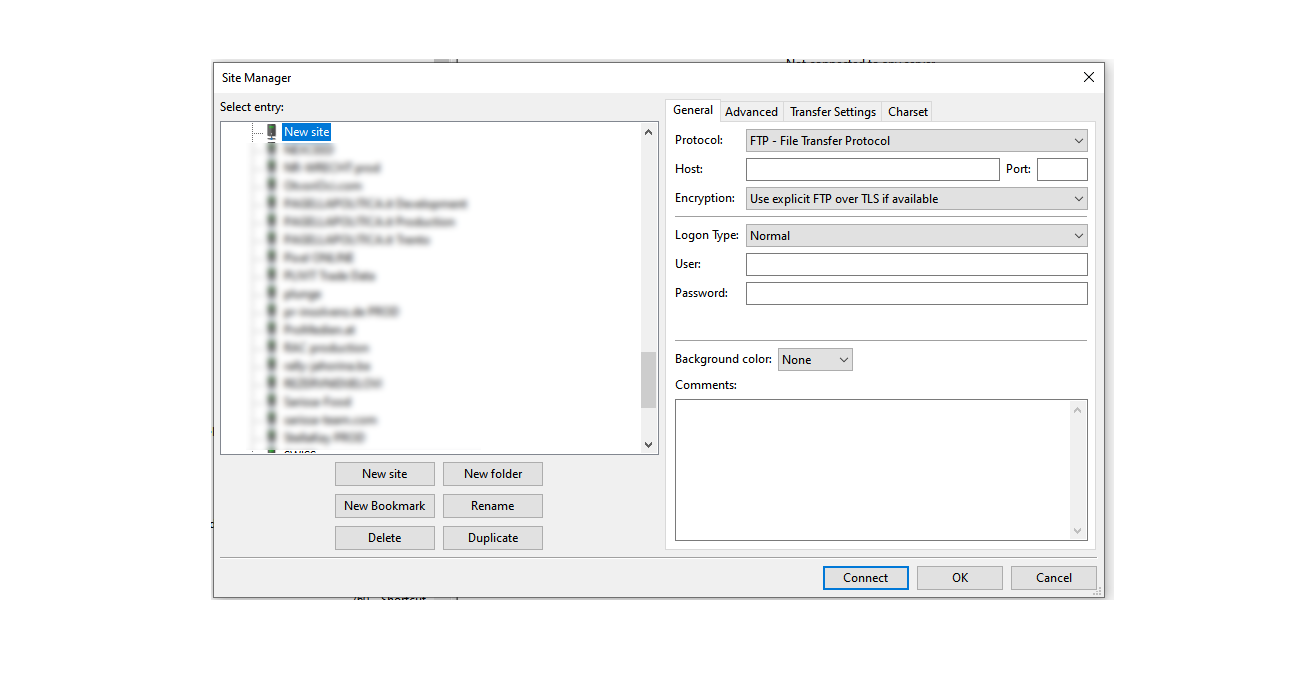
Open FileZilla and setp a connection with credentials provided by your hosting company. Once the credentials are entered and profile saved hit Connect button.
If credentials are correct FileZilla will connect to FTP server and you should see something similar to the image below. Navigate to home directory, depending on the hosting provider it can be named public_html, www or similar. Once in the web home directory in FileZilla navigate to edited package folder on your local hard drive and drag-and-drop all the files contained in the package folder to FileZilla remote folder.
After all files have been uploaded you should see something similar to this.
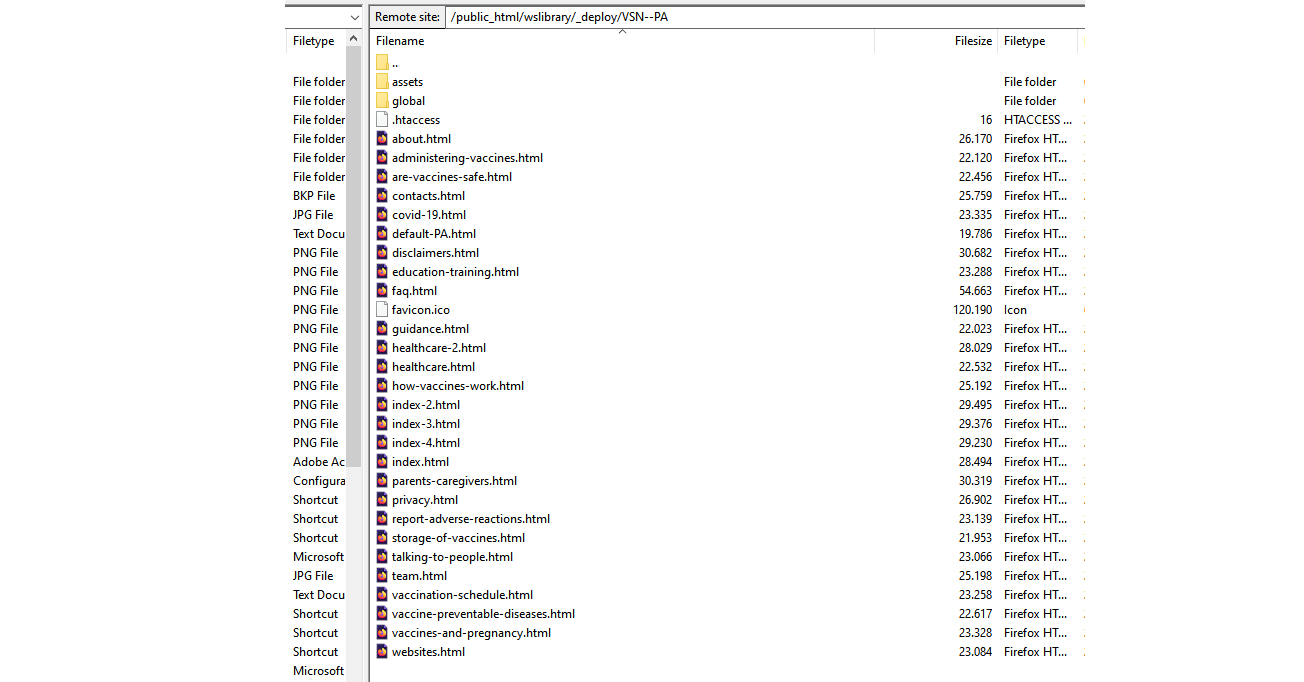
Now open Browser and navigate to your domain name. If all the steps are followed correctly you will be able to see a live website of the Institution.
File structure
Download Package
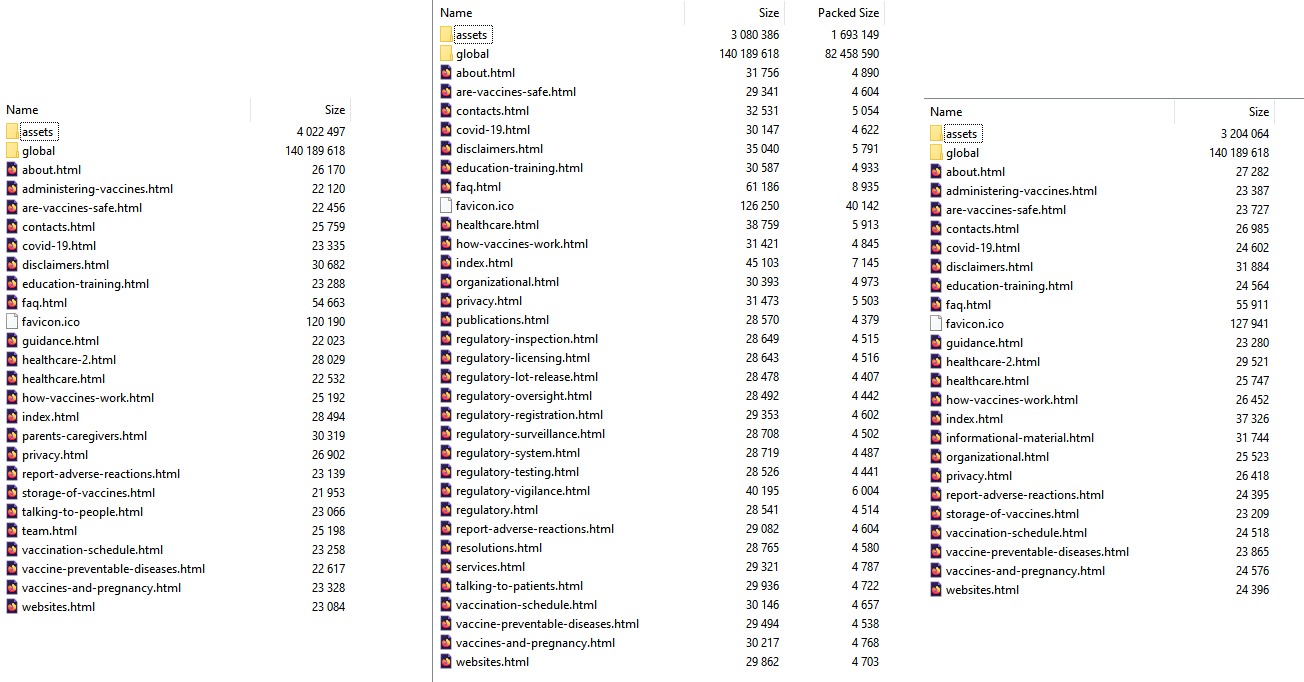
The download package main folder includes two folders /global and /assets as well as a number of example .html files.
The /assets folder is a main source folder where all assets files such as images, CSS etc. are located.
The /global folder is where different plugins, template dependencies and third party libraries like Bootstrap, jQuery etc. are located.

Note
Within a deployment scenario described in this document all of the actions will be done on .html files and /assets folder where files such as logotypes and other page specific images are located. Currently template uses image placeholders with recommended image dimensions and those should be replaced with real images representing the Institution and/or geographical region.
/assets Folder Structure
cssstyles.css and custom.cssimglogos, patterns, custom icons and othersimg-tempall content image files
/global Folder Structure
cssGlobal and Block level .css filesjscustom.js, hs.core.js and all js init files including template custom js source filesincludescss, ajax and other source filesimglogos, patterns, custom icons and othersimg-tempall content image filesfiguressvg illustrations filesvendorthird party libraries like Bootstrap, jQuery etc.
Components
Base and Blocks
Components are divided into two parts: Base Components and Block Components.
Base Components are usually small helper components to build Block Components. Base Components could be buttons, badges, icon styles, tabs, accordions etc.
Block Components are usually collection of Base Components with/without the Global Classes. It could be header, footer, news, product, team blocks etc.
Example #1 Buttons
Base Components are extended by using default Bootstrap’s components. For example, Bootstrap buttons are extended in Template to offer more stunning solutions. This gives flexibility to use pure Bootstrap buttons within the Template.
Shortcodes
As an addition to the out-of-the-box template components and elements, more advanced users have an option to extend the web page layout with easy to use and customizable UI elements. Here you can also see examples of available Colors, Backgrounds and other web page elements.
All the source codes of shortcodes components can be directly accessed from the shortcodes demo pages.
Plugins
All third party plugins (libraries) are located in global/assets/vendor/ folder
| Name | Description | URL |
|---|---|---|
| Bootstrap | Bootstrap is the most popular HTML, CSS, and JS framework for developing responsive, mobile first projects on the web. | http://v4-alpha.getbootstrap.com |
| jQuery | jQuery is a fast, small, and feature-rich JavaScript library. It makes things like HTML document traversal and manipulation, event handling, animation, and Ajax much simpler with an easy-to-use API that works across a multitude of browsers. With a combination of versatility and extensibility, jQuery has changed the way that millions of people write JavaScript. | http://jquery.com |
| Font Awesome | Font Awesome The iconic font designed for Bootstrap | http://fortawesome.github.io/Font-Awesome/ |
| Simple Line Icons | Simple Line Icons gives you 189 Icons that can instantly be customized — size, color and anything that can be done with the power of CSS. | http://simplelineicons.com/ |
| Slick Carousel | Fully responsive. Scales with its container. Uses CSS3 when available. Swipe enabled. Or disabled, if you prefer etc. | http://kenwheeler.github.io/slick/ |
| Circles | Lightweight JavaScript library that generates circular graphs in SVG. Now with animation. | https://github.com/lugolabs/circles |
| The Final Countdown for jQuery | A simple and html agnostic date countdown plugin for jQuery | http://hilios.github.io/jQuery.countdown/ |
| GMaps | gmaps.js allows you to use the potential of Google Maps in a simple way. No more extensive documentation or large amount of code | http://hpneo.github.io/gmaps |
| Masonry | Masonry is a JavaScript grid layout library. It works by placing elements in optimal position based on available vertical space, sort of like a mason fitting stones in a wall. You’ve probably seen it in use all over the Internet. | http://masonry.desandro.com/ |
| Vector Maps | Many maps of the world, world regions, countries and cities are available for download from this site. All of them are made from the data in public domain or data licensed under the free licenses, so you can use them for any purpose free of charge. | http://jvectormap.com/ |
| Appear JS | Track the visibility of dom elements and fire user defined callbacks as they appear and disappear | http://creativelive.github.io/appear/ |
| Animate.css | CSS animation library | https://daneden.github.io/animate.css/ |
| Modernizr | It’s a collection of superfast tests – or “detects” as we like to call them – which run as your web page loads, then you can use the results to tailor the experience to the user. | https://modernizr.com/ |